Adding Users
As part of the system setup, you need to add each employee who will be using TMS or that you will be tracking in the system as a user.
To add a user:
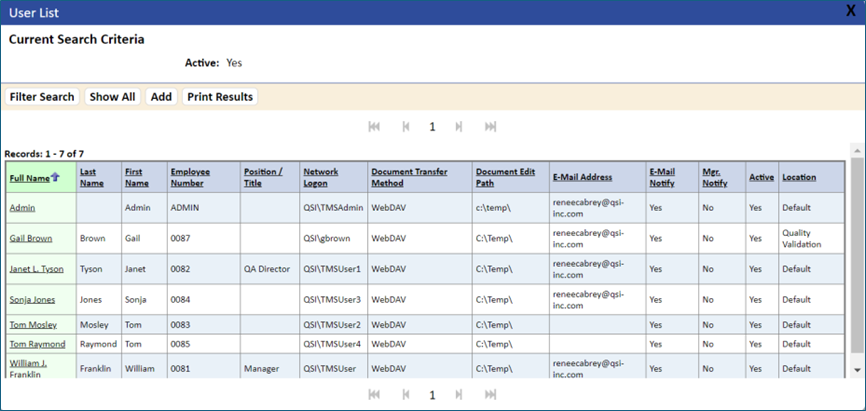
- Click the User List link.
The User List page displays.
- If you have permissions, click the Add button.
The New User Detail page displays.
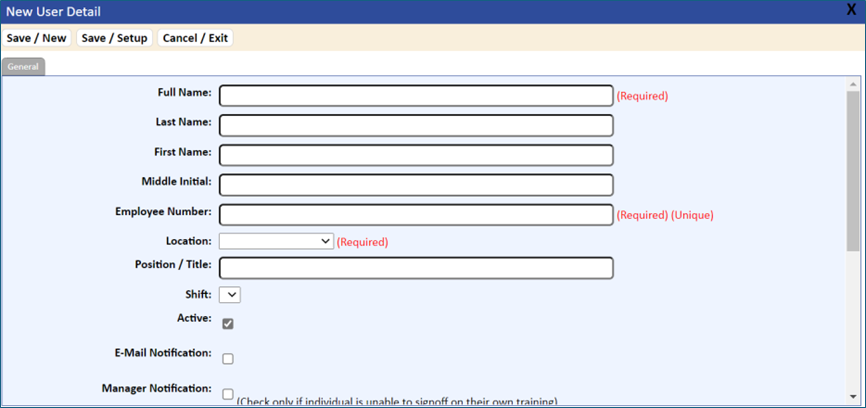
- Enter the employee’s information in the appropriate fields and options in the General tab.
The fields and options are described in the table below.
- When you have entered all of the user information, save the information by clicking the Save/New tab and continue to add new users. (You can cancel adding users at any time by clicking the Cancel/Exit tab).
To assign the user to a department, job planning, permission groups, and other user functions, click the Save/Setup button.
<add key=”AutoCreateLocalWindowsUser” value=”YES” />
<add key=”AutoCreateInitialPassword” value=”Password1″ />
The User List is automatically updated.
If using this method, a Reset Password button displays. The user can click this button if they forget or would like to change their password.
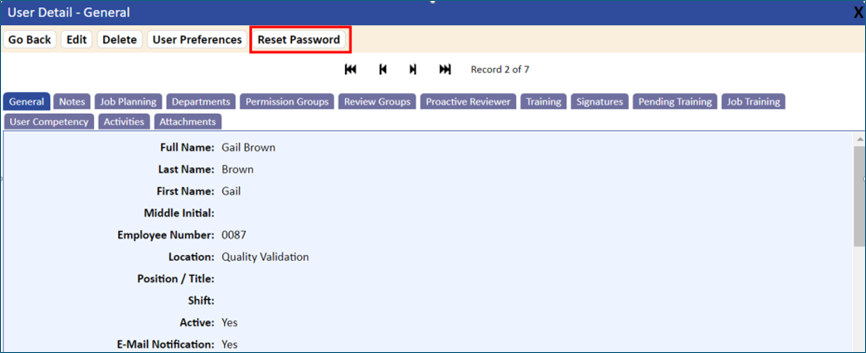
The Reset Password page displays fields for Old Password, New Password, Confirm Password.
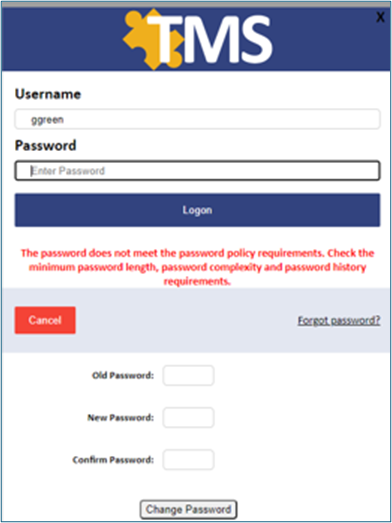
If the user enters the incorrect user name and/or password, the error message “User Name/Password Combination Invalid” displays.
If the user forgets their password, they must enter their logon and click the Forgot Password link on the initial logon page.
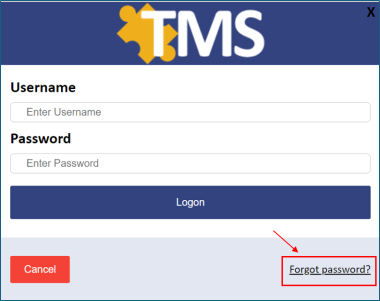
The system sends an e-mail to the user, with instructions for assigning a new password. If password complexity is set on the server, the password criteria must be met before the new password is accepted. (Refer to the information below for specifics on complexity requirements.)
If the user forgets their user name, they must contact the TMS administrator.
If using the Windows lockout, after a predetermined number of attempts, the user must contact their TMS administrator to have their password reset.
When using Application Authentication, the following options are available for passwords and also logon timeouts:
- System Time Out after <#> minutes
- System Lockout after <#> attempts; IT intervention is required
- System Lockout after <#> attempts; the user can reattempt successfully after <#> minutes
- If Password Complexity is set, the password must meet the following criteria:
- Six characters in length
- Contain characters from three of the following:
- Upper case letter
- Number
- Special character
- Lower case letter
- Not contain account name or parts of the user’s full name that exceeds two consecutive characters
- Password history is maintained, so a user cannot use a prior password
- The user is required to reset their password after a logon change due to a name change (e.g., from marriage)
- Automatic logoff after <#> minutes
- Password length minimum <#> characters
| Table 12-7 User Information Fields and Options | |
| Field/Option | What You Should Enter |
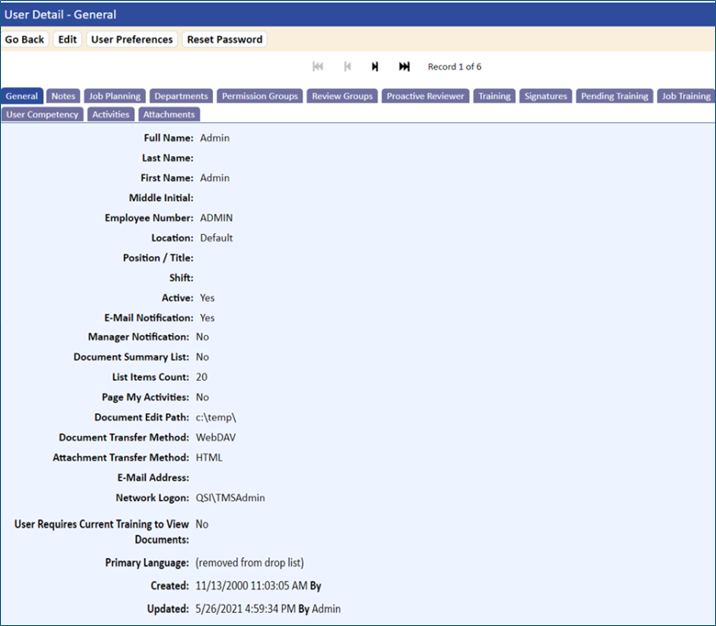
Full Name Required Size: 2000 Alpha/Numeric | The employee’s full name Note that both the full name and the name divided into last, first, and middle initial are included as fields. The full name is used in reports, while the divided name fields can be used in searches. TMS uses search functions for finding employees. If you would like to search by last name, then you should enter the full name as Last, First. If searching by first name is your preference, enter the full name as First, Last. If you decide at a later date to switch this field, or if some of the users were entered incorrectly, SQL scripts are provided with the installation to create the full name using the first name and last name fields located in the user table. Please see technical notes for further information on the SQL scripts. |
Last Name, First Name, Middle Initial/Name Recommended Size: 50 Alpha/Numeric each | The employee’s last, first, and middle name. |
Employee Number Required System checks for duplicates Size: 50 Alpha/Numeric | The employee’s ID number. Employee Number can be changed at any time; however, duplicates are not allowed. If your organization has an existing ID scheme for employees (e.g., payroll IDs), it is recommended that you simply use the same IDs in the TMS system. If you do not currently have an ID scheme, make sure that you develop one that is consistent. When users are searching for employee records, a consistent ID scheme makes it easier to use IDs as search criteria. For example, if you want to use three alphabetic characters to represent the employee’s work group and four numbers to represent the employee’s number in that group, use the same seven‑character scheme for all employee IDs. |
Location Required | This allows you to segregate employees to specific locations. Locations are tied to the permission table, which can limit who can see employees on the employee list. Users cannot be deleted from locations. They must be reassigned. Groups of users can be reassigned on the User tab in the Location table. For more information, refer to Locations. |
Position/Title Size: 100 Alpha/Numeric | The position or title of the individual. |
Shift Optional Size: 20 Alpha/Numeric | The employee’s work shift. If your organization only has one work shift, or does not have set work shifts, you do not have to use this field; however, you could use 1st for all employees. |
Active Recommended Flag | Click this checkbox on if the employee is an active employee, off if they are inactive (e.g., on leave). Inactive employees will not show up on reports unless you change the Active field on the report parameters to No for inactive employees, or Blank for both active and inactive. When a user is made inactive, the date/time and individual who made the user inactive will display next to the active flag. NOTE: Making an employee inactive does not remove ANY information or relationships pertaining to the employee. If the user contains training information, job planning, or other information, (inactive) will display next to their name. |
E‑Mail Notification Optional | Click this checkbox on if you want to have the employee receive notification of activities via e‑mail. If an employee is using TMS on a regular basis, they may want to turn this function off at a later time. You can uncheck this field, or simply remove their e-mail address. If the e-mail notification box is not selected, the user will still receive e-mails that are generated by recipient comments. |
Manager Notification Optional Flag | If selected, a user’s manager is notified (instead of the user) of training activities for the user. A user’s manager is defined in the Department function; refer to Departments. The manager would receive all training activities and would update the training activity once the manager has determined that training occurred. NOTE: A user can be assigned to multiple departments, and a department can have multiple managers. If you are using this flag, it is recommended to assign only one manager per department and assign an employee to only one department. However, if this is not possible, the system will look at the first department (alphanumerically), and then select the first manager (alphanumerically) to determine to whom to send the e‑mail notification. |
| Document Summary List | This enables a user to have a summary list instead of the full document list. The fields that are omitted from this list are the Last Revision Date and the Description/Purpose field. On most browsers this flag will decrease the document list to one line per document. |
| List Items Count | This field allows each user to have a preset number of records displayed per page. Currently this is used only for document list and user list. NOTE: It is recommended that this setting be 50 or less. The larger this number is, the longer it will take to update the page. The default for this field is 20 and can be changed in the Application Options. Placing a value in this field will overwrite the default. |
| Page My Activities | Select this option if the user has a high number of activities on a regular basis. This is usually set for document administrators. |
Document Edit Path Recommended to leave as default Size: 255 Alpha/Numeric | Enter the file path to the directory to which the system should place a copy of a document that the user has checked out for updating. This directory must exist and the user must have Read/Write privileges to the directory before check‑out can occur. The directory can be on a local drive or a network drive. Example: C:\temp or \\qsi-fileweb-new\qsi-data\checkedoutdocs\ It is recommended to use a UNC directory name whenever possible. |
| Document Transfer Method | This is used for publishing documents with TMS. The document transfer method when adding a document or when checking out/in during the review process. Possible options are:
|
| Attachment Transfer Method | This is used when attaching unpublished TMS documents to Electronic Forms or to the User And Document Detail page using the Attachment tab. Possible options are:
|
E-Mail Address Optional Size: 50 Alpha/Numeric | Enter the user’s e‑mail address. This field must be entered if you have enabled the E‑Mail Notification function for this employee. If no e‑mail address exists, the system ignores e‑mails to that particular individual. You can send multiple e-mails by separating the e-mail addresses with either a semicolon or colon. |
Network Logon Mandatory if user access is required. System checks for duplicates Size: 50 Alpha/Numeric System Checks For Duplicates | Enter the employee’s network user name. This is the user name that the employee will be prompted to enter when accessing the TMS application site. It should be a valid NT user. If a group of employees does not receive training notifications because their managers are responsible for training signoffs, you can establish a generic user login that many individuals can access and share. |
| User Requires Current Training To View Documents | Selecting this flag disables users from opening documents unless there is a current training record. A corresponding flag on the document record must also be set. This applies only to viewing documents from the document list and not opening documents for training, review, or signature from the user’s activities. |
| Primary Language | This field allows for selecting the default language of the user. The drop-down list displays only the available languages that have been installed. Your IT department is responsible for requesting and installing the specific language files. |