Viewing Forms Data
You can view or extract selected form data from forms. If you have permissions, you can edit the data directly from the View Forms Data page.
To view forms data:
- Click View Forms Data under eForms on the Tools & Setup window.
- Select the form group you would like to view.
The form fields display.
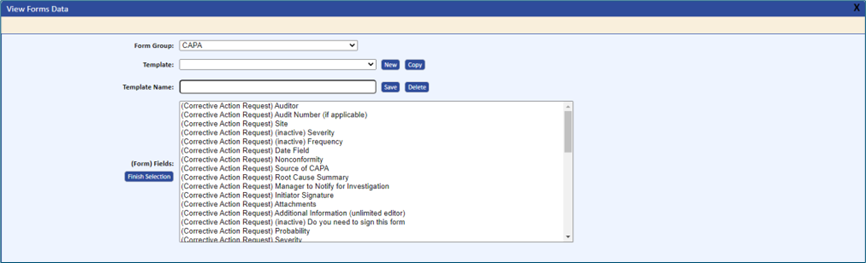
- Select all fields you would like to view.
If the packet, fields, or forms are no longer active, the field selection box displays “(inactive)” next to the appropriate information.
- Click the Finish Selection button.
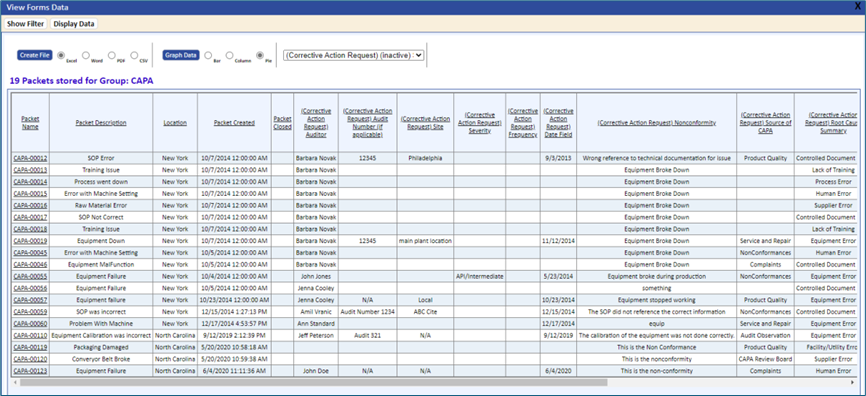
The system will automatically include packet number (name), description, and date when extracting data.
- If applicable, select the following:
- Date range of records
- Closed or Open
- Type of form data as defined
- Filter 1 (Fields display in pop-down)
- Constraints with Values
- = (equal to)
- <> (between values)
- > (greater than)
- < (less than)
- Constraints with Values
- Containing (wildcard search)
- Filter 2
- Filter 3
- Keyword from Packet Description
- Sort by 1 along with Ascending or Descending
- Sort by 2 along with Ascending or Descending
- After making your selections, click the Display Data button.
The system pulls all records that meet the selection criteria and displays the records. A link is provided so that you can link directly to the form from the Form Viewer.
- If you would like to save your selection, enter the name of the selection into the template field and then click the Save button.
The next time you run the view form data, you will be able to select the template from the template drop-down list.
- To change an existing template name, you can rename the template and then click the Save button.
The following functions are also available:
- You can copy an existing template and then rename it once you made your adjustments.
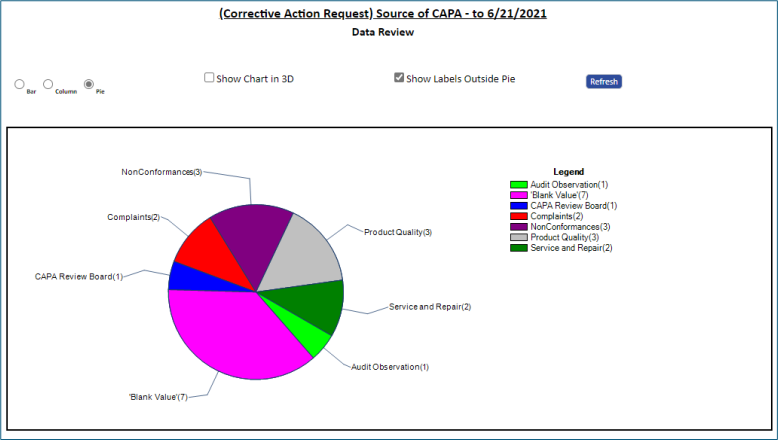
- You can graph any data that contains a drop-down list. The selected drop-down list fields will display in the drop-down list box located next to the Graph Data button. This button displays only if drop-down list types were selected for viewing.
The options for graphing drop-down list fields are:
- Pie Graph (see the sample shown below)
- Column
- Bar
You can view the form detail by clicking the packet name link in the first column.
You can export data to a PDF, Word, Excel, or CSV file by clicking the Create a File button along with the file type.
You can toggle between your filter selections by clicking the Hide and Show Filter buttons.
When selecting to extract and view signatures, any unsigned signatures will display in red.
When displaying the legends, the colored legend key will contain the full legend name while the Y axis will display a truncated version approximately 20 characters long. It is recommended, whenever possible, to keep Root Cause descriptions at a reasonable length.