Adding and Editing a Form Design
To add a form design:
- Click Form Design under eForms on the Tools & Setup window.
The Form Group List page displays.
- Select the Form Group Name to which to add a new form.
- Click the Forms button.
- Click the New Form link located in the center of the page.
The New Form page displays.
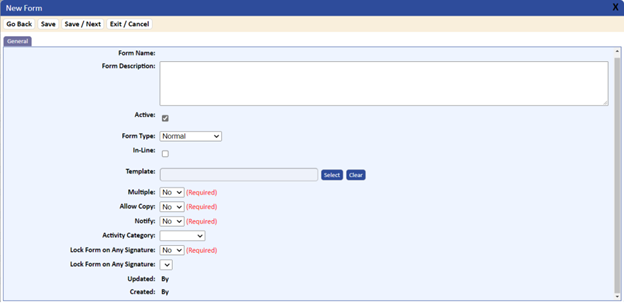
- Complete the fields and options for the New Form.
The table following this procedure describes each of the fields and options.
- Click the Save button to save the form.
|
Table 10-1 Form Page Fields and Options |
|
|
Field/Option |
Description |
|
Form Description (Recommended) |
A description of the form. |
|
Active |
This checkbox is normally selected. It should not be selected if you no longer are using a form but cannot delete it because data was entered into the form. |
|
Form Type (Skip) |
Normal should be the default (set by the administrator). |
|
In-Line (Skip) |
Do not select this checkbox (this is a reserved option). |
|
Template (Optional) |
Select the Microsoft Word template you would like to attach to the form. The template allows you to merge the database information placed on the form into a Word document. This template must be a controlled document published in TMS. For more information on creating a form template, refer to Form Templates. |
|
Create PDF Form Report |
This checkbox, if selected, will create and display the form merge report in PDF format. If not selected, the report will display in Word. The Report Generation function will use the Application Options settings for DOC_PDFCONVERSION_ALLOW_COPYPASTE and DOC_PDFCONVERSION_ALLOWPRINT when creating the PDF. This function is used in conjunction with the page name “Form Report” in the Step Detail column of the Workflow module. |
|
Multiple |
Leave the default set to No (this is a reserved option). |
|
Allow Copy (Optional) |
Enables the user to copy the entire form from another completed form. This is helpful if you have many forms that contain similar information and you would like to simplify typing by copying an existing form. All of the information can be modified after copying. When selecting this option, the form will include a Copy Form button in the upper left corner of the form. The Copy Form Data page will display the Destination Packet with a drop-down list that contains the prior Source Packet ID number and description. It is recommended that this function not be used if the form has auto-fill field types defined. Only open packets will display in the list of possible packets to copy. |
|
Notify (Optional) |
Places a standard Send Notification button in the upper right corner of the form. This permits anyone with access to the form to create activities if the form definition allows it. This option is only used on manual forms and not on forms that are part of a workflow. |
|
Activity Category (Optional) |
This option is valid only if the Notify option is selected. You can assign a group of activity types that will be available to users when creating activities for the form. For more information, refer to Adding Activity Categories. |
|
Lock Form On Any Signature (Optional) |
If selected, once any signature is added to the form, the form will be locked. Only individuals with administrator rights to the Form module are able to unlock the form. When unlocking the form, all signatures are removed from the form and the signature activities can be deleted or reactivated. |
|
Lock Form On Signature Field (Optional) |
The drop-down list includes the signature fields within the packet. This enables you to lock a form on a specific signature located on the form itself or on another form within the form packet. The list will include only fields designated as signature fields. |
|
Lock Sub-Form on Signature Field |
If selected, once a signature is added to the sub-form, the signed sub-form will be locked from further changes unless a rejection step removes the signature for further editing. |
|
Form Template Field |
This field allows templates to be assigned to the Form during packet edit. It is located on the General tab of the Form Detail page. Use this option to pull the template from the Form, instead of the default (i.e., Template ) field. Browse to the form/field that contains the location where the template will be defined during data entry. Only fields that are defined as a single object document type will display in the drop-down list. If the field is left blank, it will default to the Template field if applicable. |
|
Updated and Created By |
These fields are used as references and are maintained by the system. |
To edit a form:
- Click Form Design under eForms on the Tools & Setup window.
The Form Group List page displays.
- Select the Form Group Name whose form you want to edit, and then click the Edit button.
- From the Forms detail tab, select the Form Name to edit, and then click the Edit button.
The Form Group Detail page displays in Edit mode.
- Edit the page, then click the Save button to save your changes.