Initiating a Review
The Review Group Administrator (one must be defined for each review group) initiates a document review cycle, and then the system automatically notifies the document’s reviewers. Reviewers can also be notified if they are required to sign off on a document that is being revised.
Before actually starting the review process, you might typically check the document out and make the appropriate updates to it.
To initiate a document review and notify reviewers:
- Click Document List on the Main Menu side panel.
The Document List page displays.
- Search for the document you want to put into review, and then click the View Document Details
 icon.
icon.
The Document Detail page displays. If you are the Review Group Administrator for the document (linked to the document by the review group assigned to it), the Administrator tab is included in the tab group and that tab displays.
- If not already displayed, click the Administrator tab.
The Administrator tab displays.
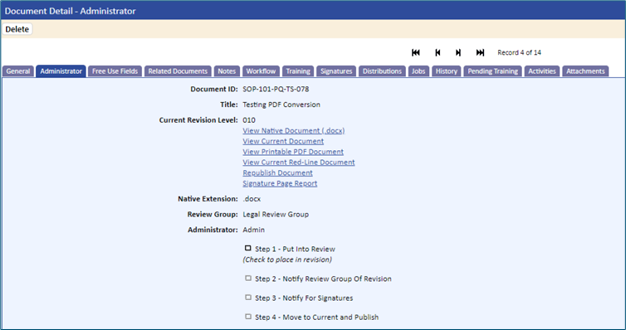
This page has links for:
- View Native Document. Opens the original document published during the Document Add routine. Valid only for documents for which PDF conversion is set to Yes.
- View Current Document. Displays a read-only copy of the current version of the document.
- View Printable PDF Document. Displays if the document is set for PDF Conversion and using watermarks. This allows for printing a controlled copy of the document without the standard watermark entered in Application Option called DOC_PDFCONVERSION_WATERMARK. If you would like a watermark on the printable PDF, then place the watermark verbiage in the Application Option setting called DOC_PDFCONVERSION_PRINTABLE_PDF_WATERMARK. For Example: “Controlled Copy”.
- View Current Red-Line Document. Displays if using redlining (an Application Option setting).
- Republish Document. Creates the corresponding PDF for the published native document. Valid only for documents that are set for PDF conversion. After clicking this link, a message displays directing the user to wait. The republish link will disappear until the document has completed its conversion to PDF. A message displays when the document has been converted. Closing the message box will redirect the user to the Administrator tab. Click the View Current Document link to display the PDF. If using Revision Stamping and/or Watermark, it will re-stamp the document with the current information.
- Signature Page Report. Displays a signature page report for all electronic signatures added to the document.
- Administrator page. Displays the native document extension, review group, and the Review Group Administrator.
To start the review process:
- Select the checkbox for Step 1: Put Into Review.
The document is copied into a temporary directory on the server for the checkin/checkout process. The administrator will be able to view the revision document at any time during the review process by clicking the View Revision Document link on the Administrator tab.
After selecting the checkbox, the Put Document In Revision page displays.
This page allows for the following:
- Entering the new revision level. The system checks for duplicates and illegal characters: (“ / \ * ? < > | ‘ ).
- Updating information in the Reasons For Change box
- Updating information in the Notes box
- Updating the Notify Review Group Of Revision checkbox

- Enter a new revision level in the New Revision Level field, and then click the Continue tab.
The Notify For Revision page displays. This is the next step in the routing process. From this page you initiate Step 2: Notify Review Group of Revision.
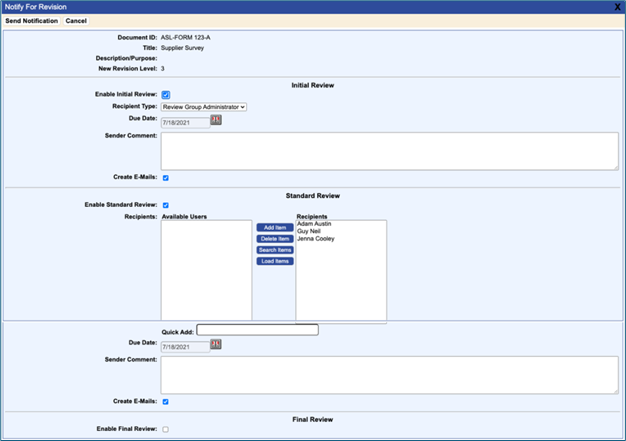
Step 2: Notify Review Group of Revision allows the following settings and entries:
- Enable Initial Review. You can assign or change an Initial Reviewer. Options are Review Group Administrator , Proactive Reviewer /Document Owner , or a specific user.
- Enable Standard Review. You can change the standard reviewers assigned to the Review Group by adding or removing who appears in the Recipients list.
- Enable Final Review. You can assign or change the Final Reviewer . Options are Review Group Administrator , Proactive Reviewer /Document Owner , or a specific user.
- Change the due dates of activities.
- Enter a Sender Comment for the reviewers.
- Skip the step for review notification by clicking the Cancel tab. You may want to do this if, for some reason, the document does not have to be reviewed by anyone and you want to skip review and go straight to the signature stage.
- Click the Send Notification tab.
Notification activities and e-mails are sent to reviewers to notify them that they have been assigned a review activity for a document. Activities will automatically appear on the user’s My Activities page. Notification e‑mails will contain a link to the TMS review activity. E-mail notifications contain the following information:
- Activity Description
- Due Date for activity
- Title and Number of Document
- Reasons for Change
- Sender Comments
- Link to View Activity Details within TMS
- Link to have activity Added to Outlook Calendar