Viewing and Completing a Review Activity
Reviewers must regularly check their TMS activities to see if they have received new review notifications. You can also open TMS from an e-mail notification for a review activity.
To check for and respond to a review activity:
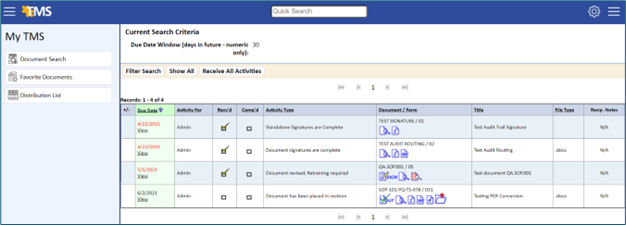
- When initially logging into TMS, the My TMS page is the default. If you are already logged in and, on another page, click the My Activities link.
The My TMS page displays.
- To review and make changes to the document, click the Check-Out
 icon in the Document/Form column.
The Received checkbox ![]() is automatically selected, and a copy of the document is downloaded to the checkout directory designated in the user record.
is automatically selected, and a copy of the document is downloaded to the checkout directory designated in the user record.
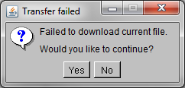
The common reasons for checkout failure are:
- The document is already open and the system cannot overwrite it
- The document download path does not exist
- The user does not have Read/Write permission for the download directory
- The correct version of Java is not installed
- The document type is not recognized by IIS, which is registered on the server and not the local workstation. (See your IT department to add a registered file type.)
A message similar to the one below displays if the document fails to checkout.
- Click the Edit Revision Document
 icon in the Document/Form column.
The common reasons for the document not opening after clicking the Edit icon are:
-
- If running Internet Explorer on Windows XP SP2 or later, a registry setting must be changed to allow the browser access to the local zone. (Refer to client setup in the TMS technical notes for additional information.)
- You may also need to add your website as a trusted site. (Refer to the TMS technical notes for additional information.)
The document is downloaded to your workstation and opened in its native application (you need to have the native application installed on your workstation to make changes to the document).
-
- When you are done reviewing and making changes to the document, save and close it.
- Click the Check‑In
 icon.
icon.
The document is copied back to the Revision directory on the TMS server.
- If the auto-complete under Application Options is set to Yes, the activity will be considered complete when checked in, and is automatically removed from the open activities.
- If the auto-complete under Application Option is set to No (recommended), you must check the Complete checkbox for the activity to be considered complete and removed from the open activities.
If you need to review your completed activities, you can search your My Activities page by expanding the Filter Search, selecting Yes for the completed option on the search screen, and clicking the Do Search button.
- If the document has attachments, you will be able to link directly to the attachments by clicking the Attachment
 icon on either the My Activities page or the Activity Detail page.
This icon will also display on the Document List page and any training activities that are issued.