Adding a New Job
To add a new job:
- Click the Job List link, located under Administration/Document Functions in the Main Menu side bar.
The Job List page displays.
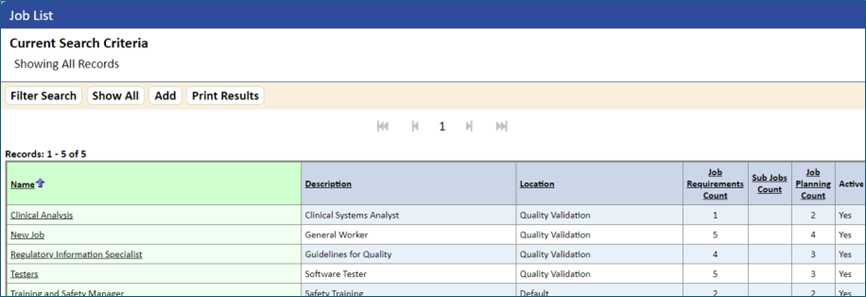
- Click the Add button.
The New Job page displays.
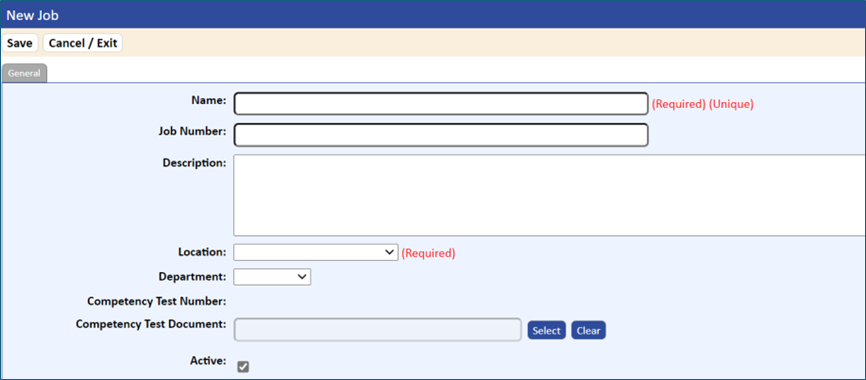
- On the General tab, enter the Name , Job Number , and Location . The Name and Location fields are required fields.
The Description and Department fields are optional. If you are using the eForms module, you can link a Competency Quiz Document for setting up competency packets for the job/individual.
- To print the list of jobs, click the Print Results tab.
| Table 12-2 General Job Information Fields | |
| Field | What You Should Enter |
Name Required Size: 50 Alpha/Numeric | The title of the job. System checks for duplicates |
Job Number Size: 50 Alpha/Numeric | An ID that uniquely identifies the job within the system. System checks for duplicates |
Description Optional Size: 255 Alpha/Numeric | A description of the job to briefly explain its responsibilities and/or purpose |
Location (drop-down list) Required | Location of the job. NOTE: Only locations to which the users have access will display in the location pop-down. |
Department Optional Size: 50 Alpha/Numeric | The department under which the job is carried out. |
| Competency Quiz Number | The competency quiz number that links the quiz to the competency assessment packet. |
| Competency Quiz Document | This field displays in conjunction with the Forms and Quizzing modules. It allows for assigning a quiz to a job that can be issued when creating a database to capture additional information about training. (For additional information about employee competencies, refer to Setting Up Competency Assessments.) |
| Active checkbox | When adding a job, this checkbox option is selected by default to indicate that the job is active. |
- To save the new job, click the Save button, and then click the Cancel/Exit tab.
The job is added to the Job List, and the information entered displays in the General tab of the Jobs page.
- To assign documents to this job, click the Job Requirements tab, then click the Edit button.
The Job Requirements tab on the Edit Job page displays.
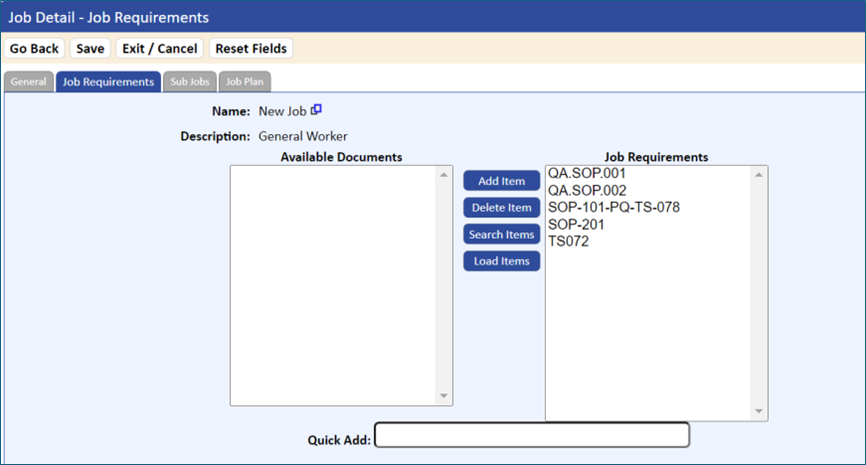
- If loading the grid, specify each document that is required to perform this job by selecting the document in the Available Documents list and clicking the Add Item button.
The document is added to the Job Requirements list.
You can remove a document from the Job Requirements list by selecting the document’s name, then clicking the Delete Item button.
- To add sub jobs to this job, click the Sub Jobs tab on the Jobs Detail page, and then click the Edit button.
The Sub Jobs tab on the Edit Job page displays.
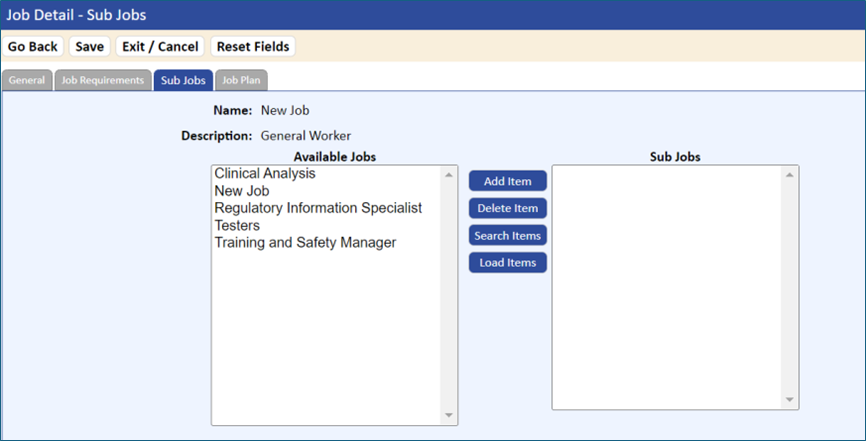
- Specify each job that is to be a Sub Job by selecting the item in the Available Jobs list and clicking the Add Item button.
The job is added to the Sub Jobs list.
You can remove a job from the Sub Jobs list by selecting the job’s name, then clicking the Delete Item button.
- To save your changes, click the Save button.